Back to Posts
2018년 9월 24일
CodeSpitz78 3/ (stack 구조) HTML parser ✨✨

🌕🌑🌑
🔥 코드스피츠 수업을 수강하면서 복습한 내용을 정리했습니다. 참고 : 렌더링 엔진 - 파싱
1. 개요 어떤 상황을 보고 구조적이고 재귀적인 형태로 파악을 할 수 있느냐, 데이터 분석을 할 수
있느냐..
BNF
<기호> ::= <표현식>
- 내부 구성요소로부터 응용구성요소 확장하는 것을 BNF 정의방식
- 언어의 구성요소를 정의하는 여러 문법들이 있다 (lex, yak)
html 기본 패턴
A = <tag>body</tag>
B = <tag />
C = text
body = (A|B|C)N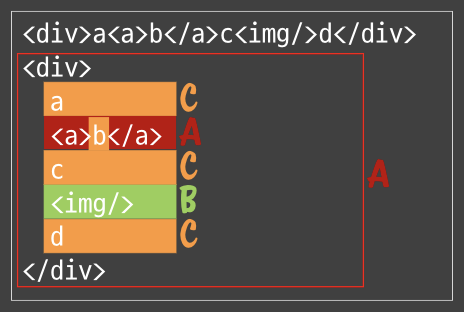
위의 그림을 파싱할 수 있는 파서를 만들고 싶다! 케이스가 재귀면서 복합적인 상황을 짤 수 있다면 중급개발자
파서의 기본 구조
- 함수의 목표, 인자값과 리턴값이 무엇인지 정의한다.
- 무슨 인자를 받아서 무엇을 리턴하지?
문자열을 읽어서 구조적으로 객체화 시켜 리턴하게 하고 싶다.
interface Result {
  name?: string;
  type: string; // text, node
  children: Result[];
}

interface StackItem {
  tag: Result;
}

const parser = (input: string): Result[] => {
  input = input.trim();
  // 초기화
  const result = { name: 'ROOT', type: 'node', children: [] };
  const stack = [{ tag: result }];

  let curr,
    i = 0,
    j = input.length;
  while ((curr = stack.pop())) {
    while (i < j) {
      const cursor = i; // 헷갈리기때문에 조회용으로 따로
      if (input[cursor] === '<') {
        // '<'로 시작하면 태그: A,B의 경우
      } else {
        // 텍스트 타입: C의 경우
      }
    }
  }
  return result;
};
중첩루프
- 첫번째 loop는 동적 루프
- 루프를 결정하는 요인이 안의 루프를 돌다가 변할 수도 있다.
- 이런 루프가 기본이다. 익숙해지자 ~
- 조건이
false가 될때까지 loop
- 두번째 loop는 정해져있는 루프
- 스캐너 루프라고 한다.
- 계획되지 않은 loop는 위험하다는 생각을 버리자.
- 스택수준으로 loop를 돌아야한다. 때문에 스택구조 루프 아래에 알고리즘이 있는 상황이다
2. 텍스트 노드 C타입: 텍스트
2-1. 순서
다음 태그까지를 파악
- name: 현재 커서 ~ 다음 태그까지의 텍스트 추출
- type: ‘text’
- children은 없다.
interface Result {
  name?: string,
  type: string, // text, node
  children: Result[]
}

interface StackItem {
  tag: Result
}

const parser = (input: string): Result[] => {
  input = input.trim();
  const result = {name: 'ROOT', type: 'node', children: []};
  const stack = [{tag: result}];

  let curr, i = 0, j = input.length;
  while(curr = stack.pop()){
    while(i < j){
      const cursor = i;
      if(input[cursor] === '<'){
        // '<'로 시작하면 태그: A,B의 경우
      } else {
        // 텍스트 타입: C의 경우
        👇👇👇
        const idx = input.indexOf('<', cursor);
        // cursor위치에서부터 < 위치: 다음 태그 전까지
        curr.tag.children.push({
          type: 'text',
          text: input.substring(cursor, idx);
        }); // children이 없기 때문에 children은 패스
        i = idx; // 다음 시작지점을 옮김
        👆👆👆
      }
    }
  };
  return result;
}
2-2. 분리
- 로직이 독립적이다.
- 따로 분리 가능 !
curr때문에 결합도가 올라가지만 어쩔 수 없는 부분
역할을 인식하자마자!! 분리하자. 나중에 분리할 때는 이미 오염되어있어서 분리시키기 어렵다.
const textNode = (input: string, cursor: number, curr: StackItem): number => {
  const idx = input.indexOf('<', cursor);
  curr.tag.children.push({
    type: 'text',
    text: input.substring(cursor, idx);
  });
  return idx;
}
interface Result {
name?: string,
type: string, // text, node
children: Result[]
}
interface StackItem {
tag: Result
}
const parser = input => {
input = input.trim();
const result = {name: 'ROOT', type: 'node', children: []};
const stack = [{tag: result}];
let curr, i = 0, j = input.length;
while(curr = stack.pop()){
while(i < j){
const cursor = i; // 헷갈리기때문에 조회용으로 따로
if(input[cursor] === '<'){
// '<'로 시작하면 태그: A,B의 경우
} else {
👇👇👇
i = textNode(input, cursor, curr)
👆👆👆
}
}
};
return result;
}
// 목표: textNode를 생성 + result 배열에 추가 => idx값(텍스트 노드의 마지막 순서값) 반환
const textNode = (input: string, cursor: number, curr: StackItem): number => {
const idx = input.indexOf('<', cursor);
curr.tag.children.push({
type: 'text',
text: input.substring(cursor, idx);
});
return idx;
}코드를 짤 때는 무조건 쉬운 것 부터 처리한다.
- why? 쉬운것의 특징은 :
- 의존성이 낮다.
- 독립된 기능일 경우가 높다.
- 의존성이 낮은 모듈부터 높은 모듈로 올라가자.
3. 태그 노드
<가 발동 트리거로 쓰이고 있다.
- 이렇게 week하게 ?
- 파서를 만들 때는 이렇게 seperator, token 형태의 트리거가 만들어진다.
트리거가 발동되는 케이스가 3가지 종류가 있다.
- 시작태그
- 닫는태그
- 완료태그
- 공통점 시작태그로 시작해서 닫는태그로 끝난다.
공통점을 찾아서 코드를 중복시키는 것을 피해야한다. 눈을 훈련해서 먼저 공통요소를 추상화 할 수 있는 능력을 키워야한다.
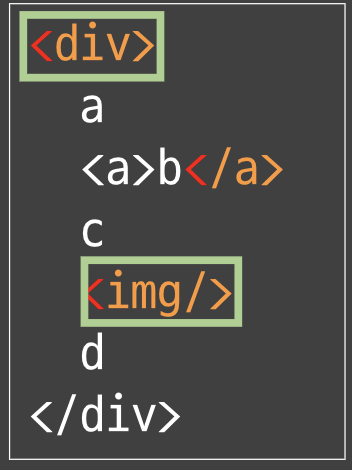
3.1 empty element <img />, open tag <div>
empty element가 더 간단해 보이므로 먼저짜긔
const parser = input => {
  input = input.trim();
  const result = {name: 'ROOT', type: 'node', children: []}; // 리턴값 : 이름이 뭐고, 타입이 뭐고, children을 뭘 갖고 잇는지.
  const stack = [{tag: result}]; // DOM 객체

  let curr, i = 0, j = input.length;
  while(curr = stack.pop()){
    while(i < j){
      const cursor = i; // 헷갈리기때문에 조회용으로 따로
      if(input[cursor] === '<'){
        // '<'로 시작하면 태그: A,B의 경우
        // 현재 cursor |<
        const idx = input.indexOf('>', cursor);
        // 현재 idx |>
        i = idx + 1;
        if(input[cursor + 1] === '/'){
          // close 태그
        } else {
        👇👇👇
          if(input[idx - 1] === '/'){
            // empty 태그
          } else {
            // open 태그
          }
        }
        👆👆👆
      } else i = textNode(input, cursor, curr)
    }
  };
  return result;
}

const textNode = (input, cursor, curr) => {...};
cf__1 코드 설계를 잘하자 좋은 코드를 짜는 비밀은 - 테스트 주도 개발에 있는 것이 아니라, -
데이터를 이해하고 재귀적인 로직을 찾아내거나 - 추상화된 공통점을 찾아내거나 - 역할을 이해하거나에 있다.
머릿속에 맨톨모델이 그려지면 코드로 똑같이 표현되어야지 정상이다.
- 그래야 나중에 유지보수가 된다.
- 그러기 때문에 주석이 필요없다.
바른 데이터 모델링이 돼었으면
- 코드는 그냥 매핑용이다.
let name, isClose; // 👈 공통 준비사항 층
if (input[idx - 1] === '/') {
  // 👈 공통 처리사항 층 ~
  // empty element 태그
  // name은 '<'와 '>'사이
  name = input.substring(cursor + 1, idx - 1);
  isClose = true;
} else {
  // open 태그
  name = input.substring(cursor + 1, idx);
  isClose = false;
}
const tag = { name, type: 'node', children: [] }; // 👈 흡수하는? 층
curr.tag.children.push(tag);
케이스는 다 값으로 바꿀 수 있다.
- 케이스의 차이를 값으로 흡수해서 하나의 알고리즘으로 만듦.
- 메모리(name, isClose)와 연산(조건문)은 교환된다.
- 연산을 메모리로 바꿈 => 메모리를 가리키는 하나의 연산만 기술하면 된다.
위의 코드 형태
- 공통 준비사항 층
- 공통 처리사항 층
- 다른점을 기술하는 부분을 흡수하는 층
cf__2 화이트리스 화이트리스 whitelist ‘안전’이 증명된 것만을 허용하는 것으로 ‘악의성’이
입증된 것을 차단하는 블랙리스트 보안과 상반되는 보안 방식 이다. 화이트리스트, 블랙리스트라는 용어 대신 ‘positive’와 ‘nagative’ 보안 방법으로 불려지기도 합니다.
const idx = input.indexOf('>', cursor);
// 현재 idx |>
i = idx + 1;
if(input[cursor + 1] === '/'){
  // close 태그
} else {
  let name, isClose;
  if(input[idx - 1] === '/'){
    // empty element 태그
    // name은 '<'와 '>'사이
    name = input.substring(cursor + 1, idx - 1);
    isClose = true;
  } else {
    // open 태그
    name = input.substring(cursor + 1, idx);
    isClose = false;
  }
  const tag = {name, type: 'node', children: []};
  curr.tag.children.push(tag);

  👇👇👇
  if(!isClose){
    stack.push({tag, back:curr});
    // ✨✨ 리턴포인트를 수동으로 정의하는 상황.
    break; // while문의 break
  }
  👆👆👆
}
분리 ~
const idx = input.indexOf('>', cursor);
// 현재 idx |>
i = idx + 1;
if(input[cursor + 1] === '/'){
  // close 태그
} else {
  if(elementNode(input, cursor, idx, curr, stack)) break;
}
...

const elementNode = (
  input: string,
  cursor: number,
  idx: number,
  curr: StackItem,
  stack: StackItem[]): boolean => {
  let name, isClose;
  if(input[idx - 1] === '/'){
    // empty element 태그
    // name은 '<'와 '>'사이
    name = input.substring(cursor + 1, idx - 1);
    isClose = true;
  } else {
    // open 태그
    name = input.substring(cursor + 1, idx);
    isClose = false;
  }
  const tag = {name, type: 'node', children: []};
  curr.tag.children.push(tag);

  if(!isClose){
    stack.push({tag, back:curr});
    // 리턴포인트를 수동으로 정의하는 상황.
    return true;
  }
  return false;
}
cf__3 가독성이 높은 코드? (변수명을 이쁘게 쓰던, 컨벤션을 지키던) 코드가 리더블하다?
Readable - 적절한 역할모델로 위임되서 그들간의 통신과 협업만 볼 수 있는 코드가 가독성이 높은 코드이다.
3.2 close tag
stack.push({ tag, back: curr });...
const idx = input.indexOf('>', cursor);
// 현재 idx |>
i = idx + 1;
if(input[cursor + 1] === '/'){
👇👇👇
// close 태그
curr = curr.back;
👆👆👆
} else {
if(elementNode(input, cursor, idx, curr, stack)) break;
}
...
const elementNode = (input, cursor, idx, curr, stack) => {
let name, isClose;
if(input[idx - 1] === '/'){
// empty element 태그
// name은 '<'와 '>'사이
name = input.substring(cursor + 1, idx - 1);
isClose = true;
} else {
// open 태그
name = input.substring(cursor + 1, idx);
isClose = false;
}
const tag = {name, type: 'node', children: []};
curr.tag.children.push(tag);
if(!isClose){
stack.push({tag, back:curr});
// 리턴포인트를 수동으로 정의하는 상황.
return true;
}
return false;
}
cf__4 css압축이나 javascript압축보다 html압축이 브라우저의 부하를 줄이는 방법 쓸데없는
노드생성을 줄인다.
const elementNode = (input, cursor, idx, curr, stack) => {
  const isClose = input[idx - 1] === '/';
  const tag = {
    name: input.substring(cursor + 1, idx - (isClose ? 1 : 0)),
    type: 'node',
    children: [],
  };
  curr.tag.children.push(tag);
  if (!isClose) {
    stack.push({ tag, back: curr });
    // ✨✨ 리턴포인트를 수동으로 정의하는 상황.
    return true;
  }
  return false;
};
4. 최종
const parser = input => {
  input = input.trim();
  const result = { name: 'ROOT', type: 'node', children: [] };
  const stack = [{ tag: result }]; // DOM 객체

  let curr,
    i = 0,
    j = input.length;
  while ((curr = stack.pop())) {
    while (i < j) {
      const cursor = i; // 헷갈리기때문에 조회용으로 따로
      if (input[cursor] === '<') {
        const idx = input.indexOf('>', cursor);
        i = idx + 1;
        if (input[cursor + 1] === '/') {
          // 닫는태그
          curr = curr.back;
        } else {
          if (elementNode(input, cursor, idx, curr, stack)) break; // 두번째 루프 break
        }
      } else i = textNode(input, cursor, curr);
    }
  }
  return result;
};

const textNode = (input, cursor, curr) => {
  const idx = input.indexOf('<', cursor);
  curr.tag.children.push({
    type: 'text',
    text: input.substring(cursor, idx),
  });
  return idx;
};

const elementNode = (input, cursor, idx, curr, stack) => {
  const isClose = input[idx - 1] === '/';
  const tag = {
    name: input.substring(cursor + 1, idx - (isClose ? 1 : 0)),
    type: 'node',
    children: [],
  };
  curr.tag.children.push(tag);
  if (!isClose) {
    stack.push({ tag, back: curr });
    // ✨✨ 리턴포인트를 수동으로 정의하는 상황.
    return true;
  }
  return false;
};Related
2019년 11월 24일